In the past year and a half, the shift from the office to work from home has significantly increased the need and usage of conference calls and online presentations and because of that, the calendar has become a critical part of all business professionals’ day to day workflow management. With all those calls in mind, we decided to provide a few tips to help you optimize your Outlook calendar and start scheduling like a pro.
.jpg?width=648&name=NewMindsetNewResults%20(42).jpg)
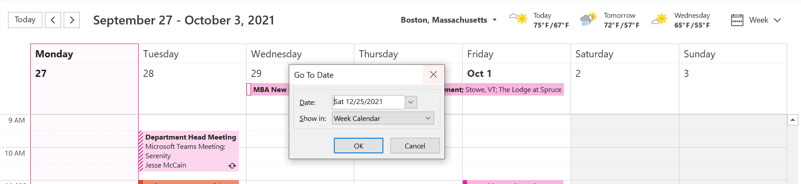
1. The Go To Date Keyboard Shortcut
Ctrl + G will populate the Go To Date window. The tip here is that you do not need to use the same date format (such as 12/25/2021) you can easily write “Dec 25, 2021” or even “Christmas”. You don’t even need to put the date in a specific order – simply write “Saturday” and it will send you to the next upcoming Saturday or write “Today” to bring you back to…well…you get the picture!
2. View Outlook Calendar from Email Inbox
Juggling between your email and calendar can be a drag on your productivity. Thankfully, Microsoft Outlook provides a seamless solution. You can now keep a mini version of your calendar within easy reach while you're working on your emails. Here's how you can streamline your workflow with this nifty feature:
-
Dock the Calendar Peek: Simply right-click on 'Calendar' on the Navigation Bar, and select 'Dock the Peek'. This action pins a miniature version of your calendar to the right side of your email screen.
-
Interact with your Agenda: Once docked, your agenda is at your fingertips. Clicking on any meeting or event in the mini-calendar preview will pop open a new window. This allows you to edit or view details without the need to fully switch over to the calendar view.
-
Quick Scheduling: Drag and drop an email onto the mini calendar to quickly create an appointment. The subject of the email becomes the title of the event, and the body of the email is placed in the notes section, making it incredibly efficient to schedule meetings around email discussions.
-
Meeting Reminders: Stay on top of your meetings with real-time reminders popping up from the docked calendar, ensuring you never miss an important event while you're focused on your inbox.
-
Customize the View: Tailor the mini calendar to show your day, work week, or full week by right-clicking the calendar peek and choosing your preferred view. This customization allows you to match the mini-calendar's view with how you manage your schedule.
-
Instant Search: Need to find a particular event fast? Use the search bar at the top of the mini calendar to quickly locate events without having to leave your inbox.
-
Keyboard Shortcuts: Enhance efficiency by using keyboard shortcuts. Press 'Ctrl + 2' to quickly bring up the mini calendar and 'Ctrl + 1' to return to mail view.
By integrating these Outlook Calendar tips into your routine, you can save time, reduce the need to switch contexts, and maintain focus on your work, all while keeping your upcoming events in plain sight.
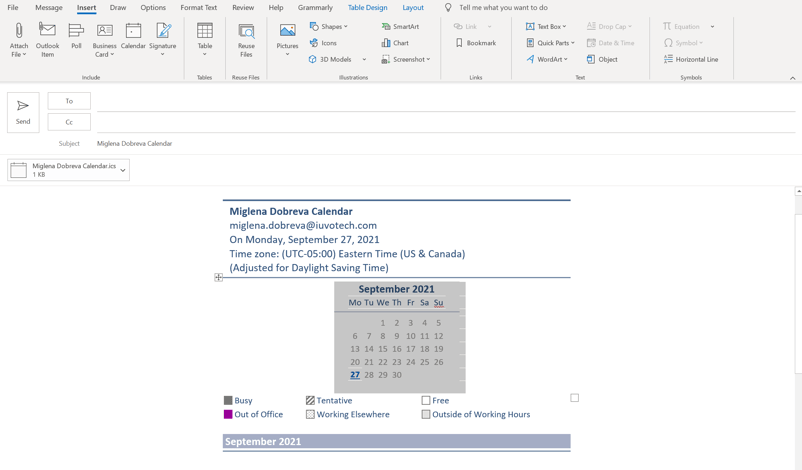
3. Share Your Outlook Calendar via Email
To share your calendar with anyone you wish and include a miniature calendar for the person you want to send it to just follow these simple steps from your outlook client: click on Insert, under Include click on Calendar, you can select the Calendar, Data Range, Details as well as a few additional options. Ready to send!
4. Automatically Apply Colors to Outlook Events
This can change the way your events look and help save some time on manually changing the colors of meetings. Go to your Calendar and select View, then View Settings. From the pop-up, select Conditional Formatting. Here you can add a condition, and give it a name to select the color. Click on the Condition button on the bottom and fill out the search words that you want to search for. You can select in: Options as well. Click Ok and test it out by creating a new meeting!
5. Convert Any Email to an Outlook Calendar Event
Transforming emails into calendar events is a breeze with Outlook. This feature is incredibly handy for quickly creating meetings or appointments directly from email content. Here’s a step-by-step guide on how to leverage this functionality to streamline your scheduling process:
-
Simple Drag and Drop: Click on the email you wish to convert into an appointment, and without releasing the mouse button, drag it over to the Calendar icon usually found in the Navigation Pane at the bottom of the Outlook window.
-
Automatic Data Transfer: Upon dropping the email onto the Calendar icon, a new appointment window will appear. You'll notice that the subject of the email populates the subject line of the event, and the body of the email fills the notes section.
-
Edit Details as Needed: From here, you can modify any details of the event, such as the date, start and end times, and location. You also have the option to add or remove attendees, set a reminder, or categorize the event.
-
Attachment Handling: If the original email included attachments, they won’t automatically carry over to the calendar event. However, you can easily add them by dragging the attachments from the original email into the open appointment window.
-
Invite Participants: Should the event require attendance by others, use the ‘Invite Attendees’ option to turn the appointment into a meeting request. Add the participants' email addresses to send them an invitation to the event.
-
Quick Access Toolbar Tip: For even faster access, add the 'Move to Calendar' command to your Quick Access Toolbar. This way, you can move emails to your calendar with just one click.
-
Recurrence Settings: If the event you're creating is part of a series, set up a recurrence pattern right from the appointment creation window. Choose the frequency, day of the week, and the duration of the recurrence.
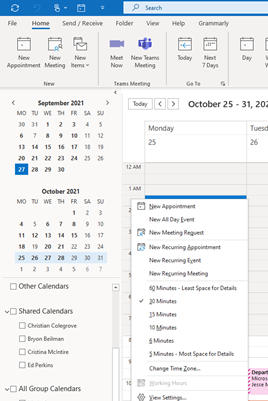
6. Change Timescale
This function is used if you want to change the timescale on your Outlook Calendar. By default, the granularity on the calendar shows 30 minutes increments. If you want granularity, you can change that by going to the left side of your calendar and right-clicking on the scale. This is helpful for example when you want to schedule 45 meetings you can switch to 15 minutes increments.
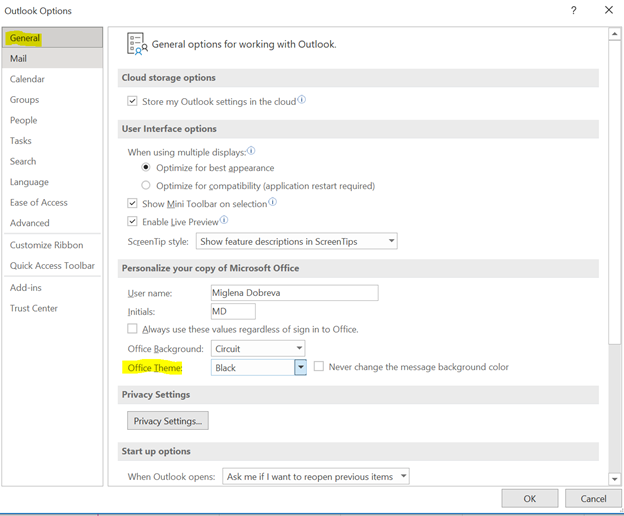
7. Dark Mode
Nowadays the dark mode is trending and a lot of applications including Outlook Calendar are offering this functionality. To use the dark mode right-click on any entry in the calendar and click on “Calendar Options”. Go to the “General tab and Personalize your copy of Microsoft Office. From the drop-down menu of Office Theme, select “Black” and click OK.
Apply These Outlook Calendar Tips Today!
Outlook Calendar isn’t just a scheduling tool; it’s a gateway to enhanced productivity and seamless time management. By embracing these tips and tricks, you are well on your way to mastering the art of the calendar, empowering you to navigate your days with precision and ease.
-
Stay Ahead: Keep a step ahead of your schedule by employing these innovative Outlook Calendar functionalities. Remember, the power of a well-managed calendar extends beyond mere appointments—it's about taking control of your time.
-
Continuous Learning: As one of the most robust email clients, Outlook is continuously evolving with new features designed to enhance your productivity. Our tips are just the beginning—there’s a whole world of shortcuts and tricks waiting to be discovered.
-
Join Our Community: Don’t miss out on any updates or insights. Subscribe to our weekly blogs for the latest news, comprehensive instructional materials, and exciting announcements from our team members. It's not just about staying informed—it's about transforming the way you work.
-
We're Here to Help: Have questions or need personalized advice on optimizing your Outlook Calendar? Our expert team is here to provide support and guide you through any complexities you may encounter. Check out our Microsoft 365 License Optimization services to help you further optimize your workflow!
Related Posts
- How to Distribute Company Office Templates and Images Using Sharepoint
- Moving a Microsoft Sharepoint Folder Using Power Automate
- Navigating Mobile Device Security