
.png)
*This Blog is an updated version to the previously published blog Centos Linux Version 8 on Windows Subsystem for Linux
Last year we looked at installing CentOS 8 on Windows 10 WSL. In the past year, there have been many changes to both CentOS and Windows Subsystem for Linux. Unfortunately, RedHat has changed the focus of CentOS, and now many folks are looking at replacing it with other free alternatives like Rocky Linux, Alma Linux, Oracle Linux, and with a developer subscription, even RedHat Enterprise Linux itself. These instructions all work for other RPM-based Linux distributions such as Fedora.
.svg)
Microsoft’s Windows Subsystem for Linux (WSL) has also changed in the past year, all of which is for the better. Integration with the host Windows environment is greatly improved, with the ability to access the host GPU directly for use with data science applications. On Windows 11, the ability to now support running native graphical applications with the need for a third party X server. Also, connecting to the WSL virtual disk is now easier than ever, through Windows Explorer; just look for the penguin in the lower-left corner.
In the case of WSL2, it is still running an actual Linux kernel, so full binary compatibility continues, and all system calls are still available. WSL1, which has binary compatibility, but lacks the Linux kernel, is also still available, but WSL2 is now the default and what most users will want.
The Root Filesystem Image
To get started, we still need a root file system image; the simplest path is to use the free Ubuntu image provided by Canonical in the Microsoft Store. However, this blog will look at building the image by hand, using public sources.
We will use Rocky Linux and the Rocky Linux Foundation as the repository. First, we need to create the filesystem image. Unfortunately, this requires root/sudo access to an already running rpm-based Linux system with dnf installed. This can be a virtualized guest running on any virtualization platform or in a cloud service. We will assume the reader has access to such a system and is logged in as a user with sudo rights.
In your Linux system, run the following to build the root filesystem (make sure you have enough at least 10 GB of free space):
$ mkdir image
$ cd image
$ cat <<EOF>> rocky.repo
[main]
arch=x86_64
basearch=x86_64
[rocky-base]
name=Rocky-Base
baseurl=http://dl.rockylinux.org/pub/rocky/8.5/BaseOS/x86_64/os/
gpgcheck=0
EOF
$ mkdir rootfs
$ sudo dnf --releasever 8 -c rocky.repo --disablerepo=* \
--enablerepo=rocky-base --installroot="$(pwd)/rootfs" \
groups install 'Minimal Install' 2>&1
$ cd rootfs/
$ echo 8 | sudo tee etc/yum/vars/releasever
$ sudo tar cvf ../RockyLinux-rootfs.tar *
At this point, transfer the file RockyLinux-rootfs.tar to the Windows WSL host; you can use a program like WinSCP or FileZilla for this. After copying the tar file, you can remove the image directory created above on the Linux system.
Install Windows Subsystem for Linux
On the Windows host, WSL must be installed and set up. Open an elevated PowerShell and run:
> dism.exe /online /enable-feature /featurename:Microsoft-Windows-Subsystem-Linux /all /norestart
This will install WSL version 1. If you don’t have Windows 10 version 2004 or newer, or you don’t have virtualization support, you can jump to Setting Up Linux, otherwise continue to configure WSL 2. (We recommend WSL 2)
While still in the elevated PowerShell run:
> dism.exe /online /enable-feature /featurename:VirtualMachinePlatform /all /norestart
If you are running Windows 11, you can get an update to the latest version of WSL through the Microsoft Store at this link:
https://aka.ms/wslstorepage
On Windows 10, make WSL 2 the default version, which we recommend, run the following in an elevated PowerShell:
> wsl --set-default-version 2
Now restart the Windows system if the elevated PowerShell is open, and the system is ready for restart run:
> shutdown /r /f /t 0
Setting up Linux
Now that the WSL is set up and installed on the Windows system, our Rocky Linux needs to be added as a Linux distribution. Open a PowerShell (doesn’t need to be elevated at this point):
> wsl.exe –-import Rocky C:\Users\{username}\Rocky {Location of the tar file}\RockyLinux-rootfs.tar
> wsl.exe -l -v
NAME STATE VERSION
Rocky Stopped 2
Your PowerShell should look similar to the above. Now that we have CentOS loaded into WSL, we can go in and make it work well. After logging back in, open a PowerShell, and type in:
> wsl.exe -d Rocky
# # First lets update all of the CentOS packages in the root filesystem
# dnf update
# # Now we can install some useful utilities
# dnf install wget curl sudo ncurses dnf-plugins-core dnf-utils \
passwd findutils
# # This will install WSL supporting software
# yum-config-manager --add-repo \
https://download.opensuse.org/repositories/home:/wslutilities/CentOS_8/home:wslutilities.repo
# dnf install https://dl.fedoraproject.org/pub/epel/epel-release-latest-8.noarch.rpm
# dnf config-manager --set-enabled powertools
# dnf install wslu
# # Create your user account to work with WSL
# useradd -G wheel {your username}
# passwd {your username}
# exit
> Get-ItemProperty
Registry::HKEY_CURRENT_USER\Software\Microsoft\Windows\CurrentVersion\Lxss\*\ DistributionName | Where-Object -Property DistributionName -eq Rocky | Set-ItemProperty -Name DefaultUid -Value 1000
The last four lines above should be typed in as one long line. Now WSL is set up with Rocky!
Additionally, if you follow the directions above with Fedora and get dnf errors, you need to switch the rpm database format to SQL Lite. You can use this command to do that:
# rpmdb --rebuilddb --define "_db_backend sqlite"
Windows Terminal
The new Windows Terminal also works well with WSL, and we recommend using it. To install Terminal, open the Microsoft Store application and search for Terminal. It should look like this:
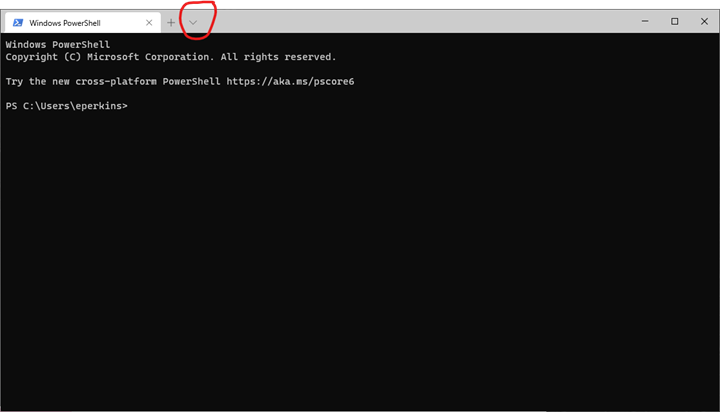
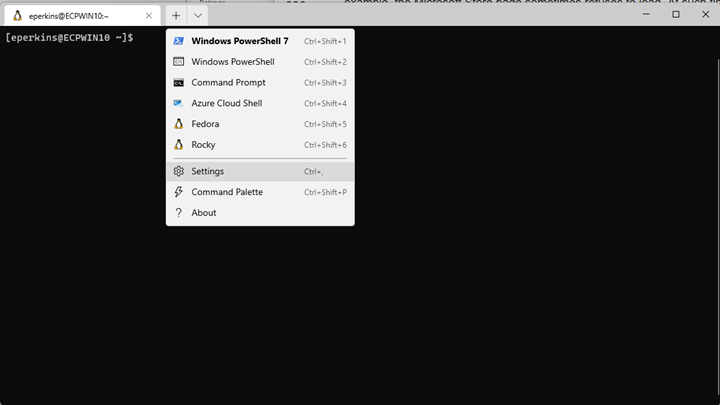
Click the Install button and after it has been installed, run it. When it is initially run, it will open a PowerShell by default, but it will find the Linux distribution, and that can be launched with the down arrow on the menu bar.
Open the Rocky tab, and you should be in Linux!
The Windows Terminal allows for many settings, some of which require modifications to the JSON formatted configuration files, while others can be changed directly in the GUI. We will take a look at a few:
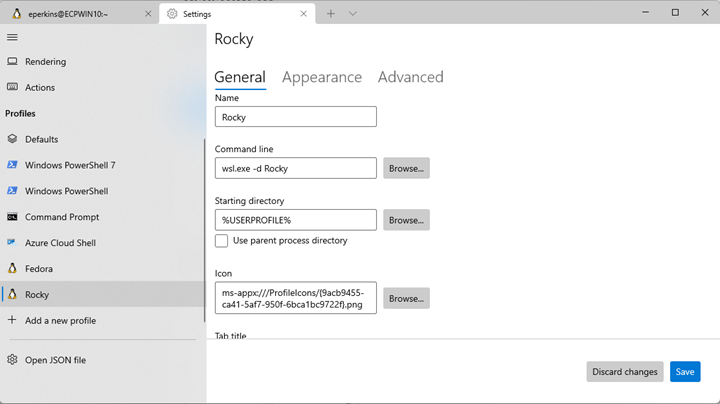
Click on Appearance, and you can see many aspects of the look and feel, such as fonts, colors, transparency. You can create your own custom themes using these instructions from Microsoft:
https://docs.microsoft.com/en-us/windows/terminal/customize-settings/color-schemes
X Windows
There is now built-in support for X Windows on Windows 11. If you are running Windows 10, it is also possible to use X Windows (the GUI for Linux) with WSL, but nothing is included. There are several free and commercial choices available. Once you have an X server setup on Windows, you can configure Linux by adding the following lines to the .bashrc file.
export DISPLAY=$(awk '/nameserver / {print $2; exit}' /etc/resolv.conf 2>/dev/null):0
export LIBGL_ALWAYS_INDIRECT=1
If you want to discuss further Linux version 8 contact iuvo today!
Related Posts:
- ACTIVE DIRECTORY AUTHENTICATED CIFS(SAMBA) FILE SHARING W/UBUNTU 20.04
- ACTIVE DIRECTORY CIFS (SAMBA) W/ CENTOS/RED HAT ENTERPRISE LINUX 8
- HOW TO CALCULATE UNIX FILE PERMISSIONS
.png)
.png)
.png)